
We don't do wheat anymore. Or any gluten containing grains.
Read more here: Religion in a Loaf of Bread and here: Is your Toast Made of GM Wheat?
And we bake our own gluten free breads because we like to know what is in the food we eat. Yet vegan gluten free breads seemed elusive, until we found Linda of Free Range Cookies.
Linda has owned and operated her own gluten free bakery, and now she uses her expertise to bake for family and friends as well as keeping her website up and running with new recipes, new comments, sharing of her tips and tricks!
Apart from being incredibly easy, by far the most vital tip of Linda's is to rest doughs in the refrigerator overnight. STOP! Don't click away, this is really, really easy, even when I'm too tired to speak, I can still manage to mix up a batch of this dough and slip the bowl of dough into the refrigerator. Just try it!
You can find Linda's original recipe for Seeded Vegan Buns here. Thanks Linda for permission.
And now here is a little bit of advice gained from baking bread for more than 30 years and in three different countries in this little old world of ours: If you do any baking at all, even wheat baking, you will know the result can vary depending upon the variety of grain, how dry the flour is, how much moisture is in the air, oven type, oven temperature, even altitude can make a difference.Even our old favourite whole wheat bread recipe turned out differently in each place we have lived.
So with a new recipe, you bake it once according to the recipe author, then you can start tweaking to get the result just right for you! This is what makes baking a science to me, and a challenge I still love after all these years!
So we tweaked Linda's orginal recipe to suit our Australian conditions! May you use this recipe to good effect for your lifestyle and the health of your family.
Vegan Gluten Free Bread Rolls
(makes 12 hamburger sized rolls) 3 1/2 cups of Sorghum Flour Blend (we use Red Sorghum as a more nutritious choice)2 Tablespoons of psyllium husk powder2 Tablespoons of chia seeds ground (measure then grind in coffee grinder or similar)4 Tablespoons of whole flax seed (golden or brown)2 teaspoons of instant yeast (we prefer to use Mauripan or Fermipan these days)1 teaspoon of gluten free baking powder (or 2/3rds teaspoon cream of tartar & 1/3rd tsp baking soda)1 teaspoon of salt (we use Himalayan pink salt)1 Tablespoon of rice syrup, maple syrup or honey6 Tablespoons of olive oil + water to equal 2 1/2 cups Tomorrow:2 teaspoons of rice syrup, maple syrup or honey dissolved in 1/4 cup warm water1/4 teaspoon of instant yeastsesame, flax or chia seeds to sprinkle (optional)Method:
In a large bowl, combine sorghum flour blend, psyllium husk powder, ground chia seeds, flax seeds, 2 teaspoons of yeast, baking powder and salt.
Into a jug, measure the 1 Tablespoon of syrup or honey, olive oil and a little warm water to dissolve the honey. Now add cool water to equal 2 1/2 cups in the jug. Stir.
Add water/oil/syrup mix to dry ingredients in large bowl. Give it a good stir to combine. The mixture will start to thicken before your very eyes as the psyllium hulls and chia seeds start to work. Amazing! Cover the bowl and slip into the refrigerator.
The next day, remove dough from fridge about an hour before you want to bake it. When ready to bake, preheat oven to about 170 degrees celcius (fan bake), or 180 degrees non-fan bake. Line a baking tin with baking paper, or use Yorkshire Pudding tins if you have them or even muffin tins. We grease our Yorskhire pudding tins with olive oil.
Dissolve the 2 teaspoons of syrup or honey with the 1/4 cup warm water and dissolve the 1/4 tsp instant yeast into the water. Add to your dough and stir. Your dough should not be lumpy and hard. The texture should be bouncy and able to be turned with your scrupulously clean hand. If dryish and lumpy simply mix in a tablespoon of water at a time until the texture is bouncy and able to be formed into balls with your hands.
Oil your clean hands and take lumps of dough (about 90 grams if you want to be precise) and form them into nice balls and pop them into your prepared tin, flatten balls slightly with the palm of your hand, sprinkle with sesame, flax or chia seeds if you wish. Leave the tin in a warm place for about 10 minutes (I have left them up to an hour when the oven was otherwise occupied), then bake for 22-25 minutes!
Cool buns in the tin for a few minutes, then remove and cool on a wire rack. Store in fridge in a bag or wrapped in a clean tea towel - if they last that long!
NOTE: If you use white sorghum flour, reduce the original water to 2 cups.
A selection of places to buy Sorghum Flour in New Zealand:
http://www.glutenfreestore.co.nz/shop/Flours+and+Starches/Sorghum+Flour.html
http://www.tastenature.co.nz/pages/17/Products
Wholesale: http://www.sherratt.co.nz/ingredients/gluten_free_ingredients
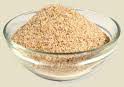
We are quite delighted with Sorghum Flour. If you can, look for Whole Sorghum also called Red Sorghum as it contains more nutrients and gives a rich colour and texture to baked goods. You can also find Sorghum Flour at Indian or Asian shops where the Indian name "Jowar" may be used. The price is good in Australia, even for organic varieties. We buy our Sorghum Flour in a 20kg bag from Santos Trading.
Family Comments about this recipe:
"Wholesome and satisfying."
"Like a gourmet bread."
"They have a really nice texture, as good as wheat."
"As good as wheat without the wheat reaction."
Posted: Sat 28 Jun 2014